Wednesday, December 26, 2012

Christmas Round-up 2012

Just a quick catch up post before I go back to lounging around and eating my way through a mountain of fruit cake, both Mums made us one this year. I hope everyone had a happy and safe Christmas, celebrating with family and friends. I had one of the best Christmas's I've had in a long while, I just wish it was more than one day, well I managed to stretch it to three.

Because I won't be baking anything for a little while, I'll leave you with a round up of this years Christmas posts.

Gingerbread Cottage
undefined
Woodland Christmas Cookies
Fruit Mince Pies
undefined
Cranberry and Pistachio White Chocolate Wreath Cookies
undefined
Gingerbread Ice Cream
undefined
Gingerbread House Stand Up Sugar Cookies
Speculaas
undefined
Nectarine Cobbler

Sunday, December 23, 2012

Gingerbread Cottage 2012

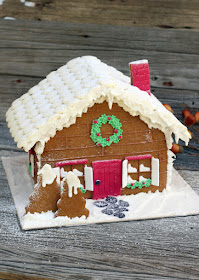
I enjoyed making last years gingerbread house so much that I've decided to make it a yearly tradition, this time going a bit more cottage-y than my pretty in pink house from last Christmas.
 I just thought I'd share a few photos because I've run out of time for a tutorial. If you'd like to know more take a look at last years house, it has the recipe that I used for both this house and the other I've made and also a step by step building guide.
 I decorated my gingerbread cottage using royal icing and little sections of fondant, like the door and shutters. The roof is easily my favourite past of this house, the tiles are white chocolate drops/melts attached with royal icing. I went a little silly with the icing sugar snow, but love how it looks covering the roof tiles.

Saturday, December 22, 2012

White Chocolate, Pistachio and Cranberry Cookie Wreaths

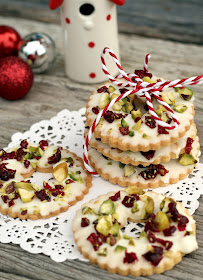
With only three more sleeps till Christmas its getting toward the business end of holiday preparation.  Whether you're looking for a last minute baked gift, something to enjoy with a peppermint hot coco or simply for some cookies to leave out for Santa, I've got you covered. These white chocolate pistachio and cranberry wreaths are relatively quick and easy and best of all they taste delicious!!

White chocolate is a favourite of mine so it was an easy choice for the topping and also saved the time and hassle of preparing icing, just melt, dunk and you're done. The sprinkling of dried cranberry and pistachios add a lovely flavour to the cookies and in red and green are the prefect colours for Christmas.
White Chocolate, Pistachio and Cranberry Cookie Wreaths (printable recipe)
225 grams salted butter (softened)
1 1/2 cups icing sugar
1 large egg
2 teaspoons vanilla extract
3 cups plain flour
1 1/2 teaspoons baking powder
3/4 cup white chocolate melts
1/2 cup pistachios
1/2 cup dried cranberries

To make the Cookies- Cream together the butter and icing sugar with an electric mixer until light and fluffy. Add the egg and vanilla, continue beating until well combine.

Sift the flour and baking powder together in a separate bowl. Gradually add the sifted dry ingredients to the butter mixture beating until it forms a dough.

Preheat oven to 190 degrees c. and line baking trays with baking paper.

Working with a 1/4 of the dough at a time, place between 2 sheets of baking paper and roll out to 1/4 inch thickness.

Cut out the wreaths using a large fluted round cutter for the outside and a smaller circle, flower or star burst cutter for the middle, remove the off-cuts and continue using until all the dough is used up.
Transfer the cut cookie shapes to the lined baking tray (1 inch apart) using a knife or spatula. If the cookies are too soft to move,  place them in the freezer for a minute until they are firm enough to transfer.

Bake the cookies until they are just lightly golden, about 10 minutes. The time will vary oven to oven so keep an eye on the first tray to see how long they take. Remove the cookies from the oven and allow to cool completely on trays.

To decorate the cookies- roughly chop the pistachios and cranberries into smaller pieces.

Pour the white chocolate drops into  microwave safe bowl, microwave the chocolate 20 seconds at a time until melted and smooth.

One at a time dip the tops of the wreath cookies into the white chocolate and place on a wire rack.
Before the white chocolate sets, sprinkle the cookie with a mixture of cranberries and pistachios.
Continue with the remaining cookies them place aside until the chocolate is set.

Enjoy!

Wednesday, December 19, 2012

Nectarine Cobbler

This recipe isn't exactly Christmas themed but with all the great stone fruit around at the moment it would make an awesome Christmas day dessert. With a full box of nectarines making my whole house smell delicious, I've been searching for a recipe to use up some of my stockpile.
I came across this recipe while browsing the stack of Christmas magazines that have made my coffee table their home. I don't often buy magazines, but at this time of year they are a bit of an impulse purchase thing for me. Funny thing is this recipe actually came form the free magazine from Coles supermarket.
The nectarine cobbler turned out nice, really really nice. The nectarines softened nicely while baking but still kept their shape and the vanilla cinnamon syrup they were swimming in was swoon worthy!
I like a lot of topping on my cobbler so actually used half the amount of fruit to the full amount of topping in the original recipe, if you like a lot of fruit use 2 kilograms of nectarines and a larger baking dish. The topping was close to scone like, not to cakey which was nice.

I can guarantee if you serve this to your loved ones, topped with a scoop of vanilla ice cream you will get hugs. Lots of them!!

Nectarine Cobbler (printable recipe)

Filling
1 kg ripe nectarines
1/3 cup plain flour
3/4 cup caster sugar
1 teaspoon cinnamon
1 vanilla bean
2 tablespoons lemon juice

Topping
2 1/4 cups plain flour
1/4 cup caster, plus extra for the top.
1 tablespoon baking paper
115 grams butter, chilled and cubed
1 egg
3/4 cup thickened cream, plus extra for brushing.

To make the cobbler- preheat your oven to 200 degrees c. lightly grease a baking dish with a little butter (I used a large pie dish).

Remove the stones from the nectarines and cut fruit into quarters.
Stir the sugar, flour and cinnamon in a large bowl, split the vanilla bean length ways and scrape in the seeds, mixing to disperse.  Add the nectarine pieces and lemon juice and gently toss to coat with the flour mixture. Set aside while you making the topping, stirring occasionally.
To make the topping add the flour, sugar and baking powder to a large bowl and stir with a wooden spoon. Add the cubed butter and rub in with your fingertips until the mixture resembles coarse breadcrumbs.

Mix in the cream and egg until the dough just comes together.
Give the nectarine mixture a stir and spread over the bottom of the prepared baking dish.

Using your hands scoop out a quarter of the dough at a time and form into rounds, place the rounds over the fruit filling spacing evenly.
Lightly brush the tops of the dough with cream and sprinkle with some extra sugar.

Bake the cobbler for about 50 minutes until the top has risen and is golden brown. If your topping is browning too quickly cover with some foil.
Enjoy with a generous scoop of vanilla ice cream!!

Monday, December 17, 2012

Woodland Christmas Cookies

I have been having a lot of fun with my woodland Christmas theme this year. I cant help myself I keep finding and falling for new decorations, I found the cutest owl in a Santa hat last week,  my tree is getting almost ridiculously full. 
Inspired by my tree and decorations I set about making some matching sugar cookies.
I think the owls are my favourite, I only wish I had thought to put some cute little Santa hats on them.

Tuesday, December 11, 2012

Speculaas

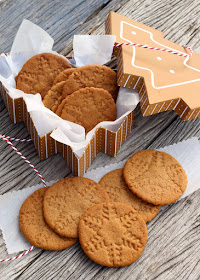
My lovely boyfriend surprised me with a new cookbook the other day, I think in the hope that I'd make him these cookies. I needed no pushing as speculaas have always been a favourite of mine. I think they are a favourite of my grandma's too, even when I was very little I remember there being a steady supply at her house.

What's not to love, they are crisp and crunchy, packed with delicious spices and usually are shaped in folk images. Sadly I didn't have any wooden mounds to make my cookies so improvised  using a fluted round cutter and a snowflake cutter. The snowflake cutter stamped the cookies nicely, giving me classic looking cookies that will be great for gifting. I'll definitely be sharing some with my Gran, that is if I can stop boyfriend from eating them all first.
Speculaas (adapted from Women's Weekly, Christmas Baking)
125 grams butter (cut into cubes)
1 1/3 cups self raising flour
1/4 teaspoon bicarb soda
1 1/4 teaspoons ground cinnamon
1 1/4 teaspoons ground nutmeg
1 1/4 teaspoons ground cloves
3/4 teaspoon ground white pepper
1/2 cup caster sugar
1/2 cup brown sugar (firmly packed)
2 tablespoons of milk

To make the Speculaas- Sift the flour, bicarb soda, spices, caster sugar and brown sugar into a large bowl. Add the cubed butter and rub in with finger tips until the mixture resembles breadcrumbs.
Add knead in a little milk at a time until the mixture forms a dough. (You may not need all the milk)

Divide the dough in two and press into disks, wrap each disk in plastic warp and chill in the fridge for 30 minutes.
Place one disk of dough between two sheets of lightly floured non stick paper, roll the dough until 1/4 inch thick.

Dust your snowflake cutter with flour and press about half way into the cookie dough, so it leaves a stamp but doesn't cut through. Line up the fluted circle cutter around the snowflake imprint and cut out cookies.  Repeat with the remaining dough, re-rolling the the off cuts as you go.
Place the cut cookies 1 1 1/2 inches apart onto a tray lined with baking paper, refrigerate the trays of cookies for at least 15 minutes before baking.

Preheat oven to 160 degrees c.

Bake the speculaas for around 20 minutes. Allow the cool completely on trays. They will rise quite a bit while baking, but will fall toward the end of baking or after removed from the oven to give a flat crisp cookie.

Enjoy!

Saturday, December 8, 2012

Gingerbread House Stand Up Sugar Cookies

Today has been filled with a whole bunch of christmasy activities, I spent a good deal of my morning enjoying wrapping gifts, finally got to finishing writing my Christmas cards this afternoon and I made these cookies.
Two years ago I made my first stand up cookies, pumpkins for Halloween, I was really pleased with how they turned out and I'm surprised at myself that its taken me this long to use the idea again. I realize gingerbread isn't for everyone, so made some cookies that have the cute gingerbread house look but with a yummy vanilla sugar cookie taste.

I think my favourite thing about these cookies is their size, they are a perfect single serving. Being little and not as time consuming as making a proper gingerbread house means I get to gift them to everyone this Christmas.
To make the Gingerbread House Sugar Cookies- prepare your favourite sugar cookie dough (Sugarbelle has a great recipe for sugar cookies and royal icing, plus great tips) and cut out an even number of houses and squares as well as half that amount of each gingerbread men and Christmas trees using mini cutters. 

Bake the cookies according to your recipe and allow to totally cool. While your cookies are cooling prepare and colour royal icing. You will need a thicker icing (for outlining)  and a thinner icing (for flooding) in each of the colours, brown, red,white and green.

Outline a square onto each of the base cookies and place aside to set.

Outline the snowy roof tops with white icing and allow to set. Once the outline is set fill with thinner white icing.

Follow the same steps again for the house and chimney, outline, set and fill with brown icing.
Set the cookies aside to dry.
While the houses are setting ice the gingerbread men and Christmas trees. For the little cookies I didn't use an outline first, instead just used thinner icing piped to make the shapes.

Once the green and brown icings are set, pipe on the little details. Using a fine tipped squeezy bottle pipe the white squiggles on the gingerbread men and the snow onto the pine trees.

Pipe some red dots onto the gingerbread men for buttons and more onto the trees as decorations.

Draw faces onto the gingerbread men with an edible pen.
Outline and fill the little doors on the houses and allow to set. 

Lastly add some details to the door in red and pipe on some little white heart windows.
To assemble the cookies position a wire rack over a container or something else that will hold it at a suitable height to lean the houses and gingerbread men or trees against.

Flood the square cookies with white icing and place under the wire rack. While the icing is still wet stand the cookie house and tree or gingerbread person into position, using the rack as support.

Finish off with a generous coat of white sprinkles. Allow the icing to set completely before carefully removing the support rack and gentle brushing off excess sprinkles.
Enjoy!

Monday, December 3, 2012

Fruit Mince Pies

Oh my gosh there are only 21 days till Christmas, already I'm feeling like there isn't enough time. I did manage to put my tree up over the weekend though and made fruit mince pies, so really I'm not doing too bad. I guess I'm going for a woodlandy kind of vibe this year, inspired by my funny looking wooden squirrels.
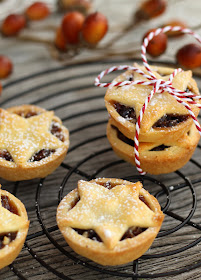
As promised, fruit mince pies (only a couple of days late.) I have had fruit mince hanging out in my fridge for the last week, waiting while its flavours mix and develop and now here's the pie part to match.

The pastry was a bit frustrating to use, its get soft very quickly and while making the pies I considered starting again. I persevered with the pastry and am so glad I did, it baked beautifully, turning out buttery, crisp and crumbly.  I found keeping the pastry cool, not easy as it was a super hot day, and dusting with a lot of flour when rolling and cutting made it easier to work with.

All up I think these are my best fruit mince pies yet, not only is the pastry yummy I also love the fruit filling. The addition of the dried cranberries makes them that bit different and are a nice change from the usual excess of raisins and currents. These pie are sweet and spicy with that little extra kick from the rum, everything you want at this time of year.
 For the fruit mince filling -See this post for the instructions.
(preferably make the fruit filling a week ahead or at least the day before) 

2 1/2 cups mix fruit (mine had sultanas, raisins, currents and mixed peel)
1/4 cup dried apricots
1 cup dried cranberries (craisins)
1/2 cup red glace cherries
1/4 cup slivered almonds
1/2 cup brown sugar 
1 teaspoon mixed spice
1 teaspoon ground cinnamon
1/4 teaspoon ground nutmeg
3/4 cup orange marmalade
4 tablespoons spiced rum
2 teaspoons vanilla essence
 For the pastry (double, if you want to use all the fruit filling)
2 cups plain flour
1/4 teaspoon baking powder
185 grams butter, cubed
1/4 cup caster sugar
2 egg yolks
1-2 tablespoons cold water (if needed)
1 egg white, lightly beaten

To make the pastry- add the flour, baking powder and butter to a food processor  process until the mixture resembles fine breadcrumbs. Add sugar and egg yolks, process until combined. If the mixture is still crumbly, add a little water to form a dough. 
Knead the dough until smooth and divide into two disks, wrap the pastry in cling wrap and chill in the fridge for at least 30 minutes.

Preheat the oven to 200 degrees c. and grease a cupcake pan with non stick spray. If you like, line each cupcake pan with a strip of backing paper to help with removing the pies.

Re-kneed the chilled dough and dust with flour, roll the dough between 2 sheets of non stick paper to about 1/2 cm thick. 

Using a large round cutter or glass cut out the pastry circles, re-roll the left over pastry and cut out an equal number of stars. 

Gently press one circle of pastry into each cupcake pan hole. Fill each pastry base with a heaped teaspoon of fruit filling and top with a pastry star.

Brush the exposed pastry with a little egg white and bake pies for around 15 minutes or until they're lightly golden. Remove from the pan once the pies are cool.
The smell in the kitchen while these are baking is awesome, enjoy the scent and enjoy the pies.