Sunday, January 30, 2011

Kombi Van Flower Cake


I'm so excited, I got to make two birthday cakes in the last week. First was the Poptarts cake and a few day later I got to make this one, I'm not sure what to call it, a flower cake, kombi cake, hippie cake? This cake was for a family friend I've know since forever, Happy 18th Birthday Emily.


I was told Emily loves kombi vans and know that she loves all things tye dye, so thetas exactly what I decided to do with her cake. For the cake itself I made a rainbow orange butter cake with orange buttercream, the flavour choice was for purely selfish reasons (I wanted to eat the leftover frosting). I really wish I got a picture of the sliced cake, the swirly icing looked so cool with the coloured cake.


To give you an idea of what the inside of the cake looked like, this is it sliced in half before icing.


How cute is the little kombie van salt and pepper shaker set!

Tuesday, January 25, 2011

Lamingtons


I will pretty much use any excuse to bake something, I love having a theme. Today is Australia Day and what’s more Australian than lamingtons. Actually it was boyfriend who suggested the idea, so we made some together today.

Lamingtons are one of the things I can remember making with my Mum when I was little, we only made them that one time though, Probably because I made such a mess. You know what, I’m still pretty good at making a mess, only now it’s me who has to clean it up. Today I was lucky, I gave the sticky covered in icing and coconut jobs to boyfriend.

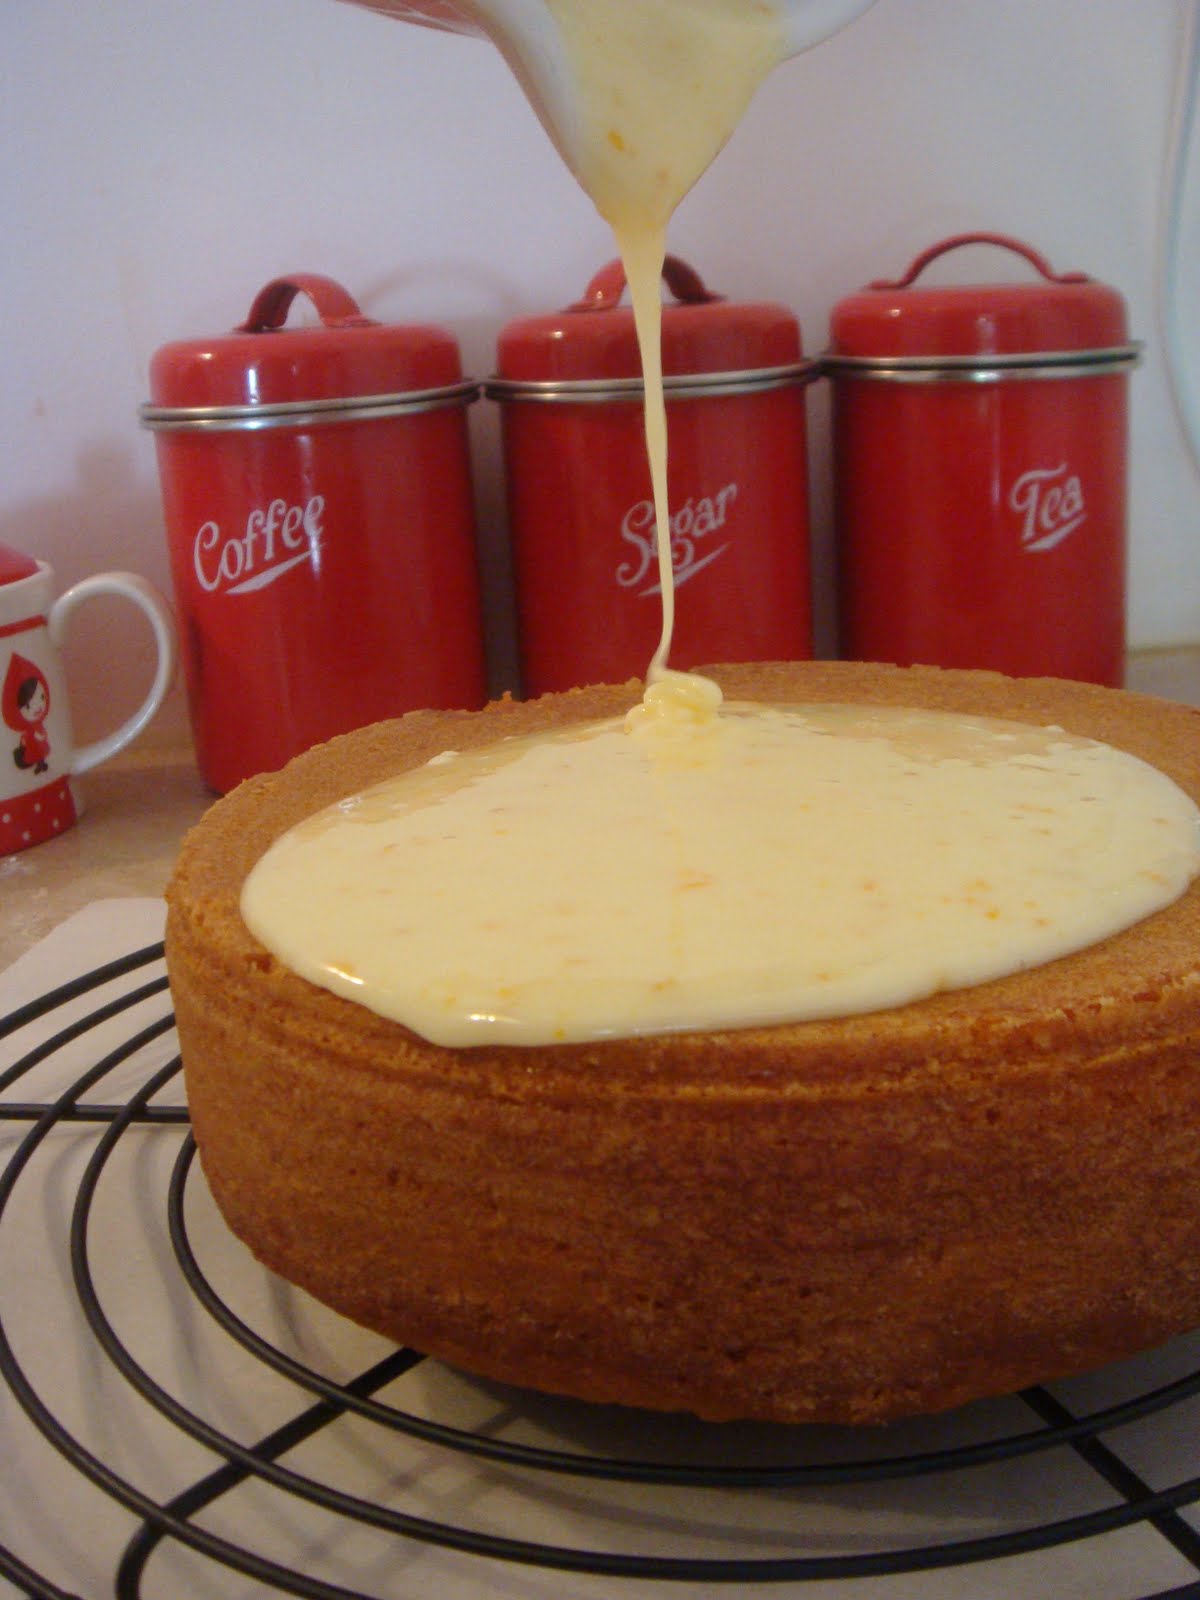
I love how easy this recipe was, so much more simple than a sponge cake, just throw everything into a bowl and mix. The cake turned out beautifully, it was so soft and moist, perfect when coated with yummy chocolate icing and nutty coconut.


For the Lamingtons
(from The Essential Baking Cookbook)

1 ½ cups self raising flour
1/3 cup cornflour
185 grams softened butter
1 cup caster sugar
1 teaspoon vanilla extract
3 eggs, lightly beaten
½ cup milk

To make the cake- lightly grease a 9 inch square cake pan and dust with flour and preheat your oven to 180°C (350°F).

Sift both flours into a large mixing bowl. Add the butter, sugar, vanilla, eggs and milk.


Beat on a low speed for one minute until ingredients are just combined. Change the speed to high and continue beating for another 3 minutes, until smooth and about doubled in volume.


Transfer the mix into the prepared baking tin and smooth over the top. Bake for 50 to 55 minutes, test the centre with a skewer, it should come out clean.

(What happens when boyfriends help)

Remove the cake from the oven, allow cake to sit in the tin for a few minutes before turning out onto a rack to cool.


For the Icing

4 cups icing sugar
1/3 cup cocoa powder
30 grams butter, melted
2/3 cup milk
3 cups coconut

To make the icing- sift the icing sugar and cocoa powder into a heatproof bowl, add the melted butter and milk.

Stand the bowl over a saucepan of simmering water, stir until the icing is smooth and shiny. Once glossy remove from heat.

To make the lamingtons- trim the crusts from the sides, top and bottom of the cooled cake and cut into even squares. The recipe said to cut it into 16, but I wanted the big lamingtons I used to get from the bakery as a kid so cut it into 9 squares.


Chill the squares in the freezer for about 10 minutes before icing to stop the cake crumbling (alternatively you could make the cake the day before).

Set out everything to need to coat your lamingtons, spread half the coconut out on a plate or small tray. Place some baking paper or a tray under a wire rack to catch and drips.

Using two forks, roll one square of cake in the icing, hold over the bowl and allow excess chocolate to drip off. (If the icing seems too thick add a tablespoon of hot water)


Transfer the coated cake into the coconut, roll until evenly coated before placing on a wire rack to set. Continue with the remaining cake, add extra coconut when necessary.

Sunday, January 23, 2011

Pop Tarts Cake


I spent ages trying to work out what kind of cake to make my brother for his birthday. I asked boyfriend if he had any ideas, he suggested something with Pop tarts. (Boyfriend built me a cake made out of Pop Tarts a few years ago).


I thought to myself 'Of Course!' If there is one person who has a bigger Pop Tarts obsession than me it’s my little brother.

Happy Birthday Josh!!


I was pretty pleased when I finished this cake last night, I figured I’d wait until morning to get some pictures. You can imagine how heartbroken I was this morning when woke up to a lopsided and buckled cake.

The heat over night had softened the buttercream and the weight of the fondant had started squishing the cake, making big wrinkles in the bottom of the fondant. Me trying to smooth things out just made it worse, I have a lot to learn about fondant.

I need air conditioning!

Ah well, there’s nothing to do about it now. The cake itself is chocolate mudcake, covered and filled with vanilla buttercream.


I know for a fact it was super tasty, someone (me) had to tackle the messy job of getting rid on the leftovers. I loved how the fondant Pop Tart and checked tablecloth cake board turned out. My brother loved it, that’s the most important part.

Thursday, January 20, 2011

Orange Coconut Cake


It seems Summer has finally hit, only about a month and a half late. After what seems like months of rain and oddly cool temps, the clouds have cleared giving us blue skies and super hot humid days.

I'm more of a winter girl but I do love the flavours of summer, my favorite is the combination of coconut and pineapple. The only problem I had no pineapple, but I did have oranges. After flicking through a whole bunch of books I found a nice and simple recipe in my very old copy of Women's Weekly Cakes and Slices for a coconut and orange cake.

The coconut made the cake lovely and moist and it had the perfect amount of orange flavour. The original recipe suggested an orange buttercream frosting, but I love the look of drizzle icing and it's so so easy.

For the cake

1/2 cup coconut
1 cup milk
125grams softened butter
1 tablespoon orange zest
2 eggs
1 3/4 cups self-raising flour

To make the cake- In a small bowl combine milk and coconut, allow to stand at room temperature for one hour.


Grease and flour a cake tin. (I used a 8 inch round tin) Preheat the oven to 180 degrees c.

In a medium bowl, cream together butter, sugar and orange zest until light and fluffy.

Add the eggs one at a time, beating until combined.

Mix in half of the flour and half of the coconut and milk.

Add the second half of the milk, coconut and flour and continue mixing until the batter is smooth.

Pour the cake batter into the preparded pan, smooth over the top.


Bake the cake for 1 1/2 hours until a skewer poked into the middle comes out clean. Remove the cake from the oven and allow to stand for 5 minutes before turning out onto a wire rack to cool.

Once the cake is totally cool pour the icing onto the cake, spread over the top and allow to drip down the sides.


For the icing

1 1/2 cups icing sugar
3 tablespoons squeezed orange juice
1 teaspoon orange zest.

To make the icing- whisk together all ingredients until smooth. Pour over cooled cake.


PS. I have been dying to show off the beautiful teacup boyfriend got me for Christmas, I love it so much.

Tuesday, January 18, 2011

Valentines Heart Cookies


I am loving all the cute valentines ideas I have been seeing in the blog world. Inspired by the lovely vintage valentine hearts made by Bubble and Sweet and my new pretty book The Biscuiteers Book of Iced Biscuits, I used the second half of the cookie dough left over from my animal cookies to make some hearts.

Boyfriend and I accidentally have a kind of valentines tradition, he gets some kind of themed baked good and I get a silly/funny/lovely card. I remember our first valentines together, I gave him a heart shaped cookie (by Mrs Fields not me) with the words 'I love your guts' iced on.

I dont know what I will make for him this year, maybe something like these cookies?

Icing these heart cookies kicked my butt, the royal icing and my squeezy bottles just didn't want to cooperate. I love this chocolate cookie recipe, they turn out crispy and tasty and contrast really well with bright coloured icings. Overall I'm really pleased with how they turned out.


Chocolate Cookies

1 ½ cups plain flour
½ cup cocoa powder
Pinch of salt
¼ teaspoon cinnamon
¾ cup (1 ½ sticks) unsalted butter (softened)
1 ½ cups powdered sugar
1 egg
½ teaspoon vanilla extract

To make the cookies- Sift together the flour, salt, cocoa and cinnamon.

In a bowl cream together butter and sugar until fluffy and pale.
Add the vanilla extract and egg to the butter mixture, beat on medium speed until combine.

Gradually add the flour, mix on low speed until just combine.

Divide the cookie dough in half (it will be very soft). Flatten each half into a disk and wrap in cling wrap. Chill the dough in the fridge for at least an hour.

Remove one disk of dough from the fridge, roll the dough between two sheets of baking paper until it’s about ¼ inch thick.

Using various sized heart cutters cut out the cookie shapes. If the dough has softened chill for a few minutes to make cutting the shapes easier.

Preheat oven to 180 degrees c. Line trays with non stick paper.

Position the cookies on lined trays about 3cms apart. Place the cookie sheet in the freezer until cookie dough is firm.

Bake the cookies until crisp, about 10-15 minutes. Let cool on baking trays.

For the Royal Icing

4 cups icing sugar
1/4 cup meringue powder
2-3 tablespoons water (as needed)
green, black and pink food colourings

To make the icing- add all the ingredients into a medium bowl, beat the ingredients about 7 minutes until smooth. If the icing is too thick add a little more water at a time. (Thin the icing with small amounts of water as needed when flooding the cookies)

Pipe the heart outlines onto the cookies using a fine piping tip. Allow the outlines to set before flooding with icing.

Once the outlines are dry, it is time to flood the cookies with thinned icing. Use a toothpick to spread the icing and remove any air bubbles.

If adding polka dots, drop small dots of alternative coloured flooding icing into the solid coloured heart while still wet.

Allow the flooded icing time to dry before piping on the the swirls and roses.

Wednesday, January 12, 2011

Brisbane Flood, plus Animals and Ark Cookies


My baking is often influenced by my moods, thoughts, emotions, it’s a way of telling a story.At the moment the story of my city and state is rather sad, with serious flooding effecting three quarters of Queensland. My thoughts go out to those people that have lost homes and loved ones.

I consider myself very lucky not to live in a flood threatened area, although damage can be seen as close as the suburb next to us. Yesterday I was one of hundreds on central Brisbane workers being told to leave work early and get out of the city. Today people not immediately effected are being urged to stay in their homes, I spent most of the day watching the news coverage on TV, sometimes hardly believing what I was seeing.

Along with a lot of the Brisbane, we had no choice but to sit and watch as a rising tide of water overtook a lot of inner city and surrounding areas. It is expected to be much worse tomorrow.

While there was a lot of devastation, there were also many stories of people really working together and helping others out.

People were not only looking out for each other but pets and other stranded animals, this story is what inspired me to bake today. These cookies brought smiles to a number of worried people, with uncertainty and not knowing quiet what to expect being some of the scariest factors. While I hope not to seem insensitive, frankly the city could really do with an ark.


To make the ark and animals I used the same recipe as my Bride of Frankenstein Cookies, made for a Halloween guest post on Pink Little Cake. I found that I didn’t have as many animal cutters as I thought, so I just picked my favourite three. We don’t have squirrels in Australia, but I really love them and wanted to use my cookie cutter.

Sunday, January 9, 2011

Mini Chocolate Mudcakes


It seems that almost everyone I know have birthdays that fall in either October or January. Happy birthday Peter, I made you these cakes yesterday but still haven't given them to you.

I used my Kitchenaid for the first time! The recipe probably didn't really need it but I had to use it sometime. Usually after I bake, the dishes and cleanup tend to get forgotten about until later. Not this time thought, my mixer was clean within minutes, back to looking shiny and new on my kitchen bench.

Because I made a mess of the cupcake wrappers I ended up taking them off after baking, they didn't look pretty but boy were they yummy. They are some seriously rich cakes, bam a punch of chocolate straight to the face! My number one tip, have a big glass of milk handy. If you don't like the milk idea you could always warm the cake a little in the microwave and eat it with a dollop of cream, or go nuts, make it ice cream.

Chocolate Mudcakes (Adapted from Cupcakes Cheesecakes Cookies.)

165 grams butter
100 grams dark eating chocolate (coarsely chopped)
1 1/2 cups caster sugar
2/3 cup water
1/4 cup coffee liqueur (I used Tia Maria)
1 cup plain flour
2 tablespoons self raising flower
2 tablespoons cocoa powder
1 egg

To make the cakes- Preheat oven to 170 degrees c. Line cupcake pan with 12 cupcake papers.

Combine butter, sugar, water and Tia Maria in a small saucepan, stir over a low heat until all are melted together. Transfer the mixture to a medium bowl and allow to cool for at least 15 minutes.


Sift together flours and cocoa, whisk into cooled chocolate mixture. Add the egg and mix until combined.


Divide the mixture evenly into the cupcake pan. (You can choose to be messy like me, or not)


Bake cakes for about one hour. Transfer cakes onto a wire rack to cool.


Spread top of cakes with a generous amount of ganache.

Dark Chocolate Ganache

250 grams dark eating chocolate
125 mills thickened cream

To make the ganache- finely chop the dark chocolate, transfer chopped chocolate to a medium size bowl.


Bring cream to a boil in a small saucepan, pour the hot cream over the chocolate. whisk together until thick, smooth and glossy.

Wednesday, January 5, 2011

Hot Dog Cookies


Happy first week of 2011! I'm back from my post Christmas baking break. I've just taken down my Christmas baking timetable off the fridge (seriously I made a timetable) and am ready for a new year of baking and blogging.

I am so happy with how these cookies turned out! They look adorable.
These were a birthday treat for one of the guys at work, he is a big hot dog fan and loved the cookies.

Happy Birthday Scott.


I had originally intended to make hot dog sugar cookies but was so very very glad to find this recipe, it was way to hot to be rolling dough. These tasty shortbread were quick and easy to make, the only time consuming part was chilling the dough.

The original recipe said that this mix makes 17, I only got 14 but my cookies may have been a little larger. Instead of using bought icing, I used royal icing for the sauce and mustard and left out the green coconut (coloured coconut weirds me out)


Hotdog Cookies (Recipe from Taste of home)

For the cookies

1 cup butter, softened
1/2 cup confectioners' sugar
1 teaspoon vanilla extract
2 cups all-purpose flour
red food colouring

To make the cookies- Cream together butter, confectioners sugar and vanilla in a medium bowl until light and fluffy. Stir in the flour until dough is smooth.

Remove one third of the mixture into a second bowl, add a little red food colouring at a time until the desired sausage colour is achieved.


Cover both bowls of dough and refrigerate for 1 hour.

line a cookie tray with baking paper. Preheat oven to 180 degrees c.

To make the sausages divide the red dough into 14 portions. Roll each piece into a 3 inch long sausage shape.


To make the buns, divide the white dough into 14 portions and shape into 3 inch rolls. Press center of buns with the handle of a knife to create the slice for the sausages. Gently place the dough sausages into the open dough buns.


Move the cookies to the baking tray, spacing them 2 inches apart. Bake cookies 12-15 minutes, until firm and lightly golden.


Allow cookies to cool on trays before piping on the ketchup and mustard icing.

For the Icing

1 cup icing sugar
1 tablespoon meringue powder
water
red food colouring
yellow food colouring

To make the Icing- In a small bowl mix together icing sugar, meringue powder and a little water at a time to form a think paste. Continue mixing until icing is smooth.

Divide the icing into two bowls, colour one half red and one half yellow.


Using a fine piping tip, pipe a zigzag of red and yellow icing onto each hotdog cookie, allow to set.