Monday, September 26, 2011

Cupcake Cake Toppers

Not having an oven is making me sad. To cheer myself up I decided to do some making instead of baking and did up a little tutorial for some fondant cupcake toppers. I first made these little toppers for a set of cupcakes last month and fell in love, they are so super cute. As a last post for my September theme sweets made from sweets, I'm sharing a step by step guide on how to make these adorable little fondant cupcakes and a 2D version as well.
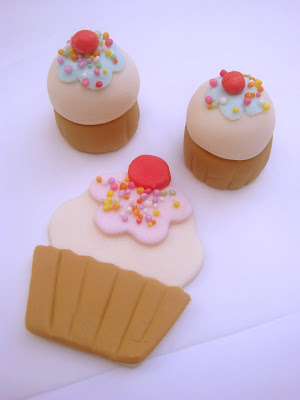
For the Cupcake Toppers

Ready made fondant
Colouring gels (I used brown, pink, blue, red, and skin tone)
Icing sugar for dusting

To make the 3D cupcakes-Shape the tops of the cupcakes. I used 1 teaspoon measuring spoon, it was the perfect size and shape. Brush the spoon with a little icing sugar before pressing in the the fondant to stop it sticking.
To make the icing on top of the cupcakes roll out a little coloured fondant to about 4mm thick. Using a 1cm blossom cutter cut out small flowers as you need them. Lightly roll the flower to flatten. Brush the cupcake top with a little water and press on the flower.
Brush the the flower with a tiny bit of water and cover with some sprinkles. Roll a little ball of red fondant and press onto the top for the cherry.
To make the cupcake bottoms, roll the fondant into a short cylinder. Pat down either end with flat spatula or smoother to make the top and bottom. Make the cupcake bases the same size as the cupcake tops.
Brush the base of the cupcake tops with a little water, press gently onto the cupcake bottoms. To finish of the cupcakes, press in the lines on the cupcake cases.
To make the 2D cupcakes-Roll out the each of the colours to about 4mm thick.
Cut out the cupcake shape from the main colour using a small cookie cutter.
Cut a small flower in the colour of the cupcake icing.
Using the bottom half of the cupcake cutter, cut out the cupcake bases from the brown fondant. Trim off the tops to form the cupcake case.
Cut a little red cherry with a tiny circle cutter.
Using the cupcake cookie cutter trim the flower to the same shape as the top to form the icing.
Brush the back of the cupcake bottom with a little water and press onto the whole cupcake.
Use a little water to attach the icing to the top of the cupcake, brush the icing with a bit more water and add the sprinkles.
To finish the cupcake attach the cherry with a light brush of water and draw in the cupcake paper lines.
I hope you love these as much as I do.

Monday, September 19, 2011

Icecream Cone Cupcake Stack

My oven is broken! I know, terrible right. It is pretty sad, but having no hot water for the two days before the gas man could come and take a look at the oven were way worse. The good news, the gas hot water is back on so no more cold showers plus I can still use the cook top. The bad news, my oven is still broken so no baking for awhile. Luckily or unluckily (as these were some of the cupcakes I was baking when the oven broke) I did make a number of cupcakes to share with you.
Over the weekend we had our first really hot days of the spring, now all Ican think about is icecream. I though it fitting for the weather and my September theme, sweets made of sweets, to have a quick attempt at a cupcake icecream stack. I had been wanting to try this fantastic idea from MyCakeSchool for so long and had a few cupcakes left over from another project. Head over to MyCakeSchool for the easy to follow tutorial accompanied by beautiful pictures of how to make a cupcake icecream. I cant wait for an occasion to make this idea on a bigger scale, a icecream party would be fun.

Tuesday, September 13, 2011

Lollypop Cookies

I mentioned in my last post I was going to try to stick to a bit of a theme with my September posts, here is my second sweet made of sweets idea, Lollypop Cookies.
I don't really know what to say about these cookies except- how cute are they? These might be the coolest cookies I've ever made, they were so easy but I think they look awesome! I can't wait to make some for halloween, I think some in orange and black will be a great addition to a halloween dessert table.
To make the cookies- Prepare cookie dough. (I used my usual sugar cookie recipe)

Divide the dough into equal parts and knead a different colour into each. I used pink, yellow, and blue.

Take a small amount of each colour of dough (a bit over a heaped teaspoon) and press one on-top of the other.
Role the dough out to form a rope around 30cm long.
Twist each end of the rope in the opposite direction to make the swirling pattern.
Coil the rope of dough up into a tight coil.
Make the cookie to the size you like (they will spread a little while baking), trim off any excess and gently press the end to attach.
Place the cookies in the freezer for 5 to 10 minutes to firm up a little so they hold their shape as you gently push in the popsticks.
Bake the cookies according to the sugar cookie recipe. Allow them to cool on the baking trays.
Decorate with little bows and enjoy!

Tuesday, September 6, 2011

Doughnut Cookies

Months ago I bought a cutter for making doughnuts, I've wanted to make them so many times since but haven't had the time to devote to them. I found the doughnut cutter earlier this week as I was attempting to sort out my ever growing cookie collection.

I decided to use it to make some cookie look-a-like doughnuts rather than fiddling around with dough making and raising times. In the end I didn't even use the cookie cutter as I wanted to make smaller puffy cookies, but will definitely use it to make some rolled cookies soon.
This one idea inspired me to make September a month of themed baking, sweets made of sweets. Hopefully most of this months post will be treats either inspired by or look-a-likes of other baked goodies, I'm thinking maybe some cookie lollipops, icecream cupcakes, and cookie pies as a few ideas.

Here is the first, cookie doughnuts. So so much faster than the real things but just as cute.
To make the Cookie Dough- prepare the cookie dough, I used this sugar cookie recipe.

For the Strawberry Glaze Icing
2 cups icing sugar
1 teaspoon butter
2 tablespoons boiling water
pink colouring (how much you like)
1/2 teaspoon strawberry flavouring

To make the Icing- sift the icing sugar into a small bowl, stir in butter, colouring and strawberry flavouring and enough water to make a smooth icing. (The consistancy should be similar to thickened cream.)

To make the Cookies- Roll tablespoons of dough into balls.
Slightly flatten the balls of dough and cut a circle out of the center (I used the smaller end of my large plain piping tip.)
Place the cut cookies on a lined baking tray, about 2 inches apart. Chill the tray of unbaked cookies in the freezer for 5 minutes to stop them spreading too much while baking.

Bake the cookies for around 18 minutes until slightly golden. Allow the cookies to cool on trays before icing. While the cookies are cooling prepare the glaze icing.
Dip the top of the cookie into the strawberry glaze, gently lift out and allow a little of the excess icing to drip off.
The glaze will settle to coat the top.
Sprinkle the doughnut cookies with some pretty sprinkles.
Place the cookies wire rack to allow any excess icing to drip off.
When the glaze is set, eat them up!

Friday, September 2, 2011

Chocolate Cake

Are you look for a delicious, super easy chocolate cake? Yes? I've found it! I'm pretty sure this is the yummiest chocolate cake ever and its not just me saying that, everyone who has tried it has said the same thing.

The recipe is actually from the Hersey's website, its called the 'Perfectly Chocolate' Cake and they're not wrong. I don't have any Hersey's cocoa so used my regular dark cocoa with great results.

I've used this recipe a number of times now, for the cars cake and for some chocolate lamington cupcakes a while back, it has always turned out super moist and oh so chocolaty. I haven't even mentioned the most swoon worthy part, the icing, I did things a bit different from the original recipe but it was yummy. I don't know know how to describe it, its so smooth and creamy, it almost reminds me of chocolate mousse.
The cake is very simple and easy to make, basically just mixing all the wet ingredients into all the dry ingredients and putting it in the oven.

I think I've used all the words for awesome I know in this post, its yummy, perfect, moist, chocolaty, swoon worthy, delicious! Please try it.
  • For the Chocolate Cake

  • 2 cups sugar
  • 1-3/4 cups all-purpose flour
  • 3/4 cup Dark Cocoa Powder
  • 1-1/2 teaspoons baking powder
  • 1-1/2 teaspoons baking soda
  • 1 teaspoon salt
  • 2 eggs
  • 1 cup milk
  • 1/2 cup vegetable oil
  • 2 teaspoons vanilla extract
  • 1 cup boiling water

To make the cake- Preheat your oven to 180 degrees c. Grease and flour two 8 inch round cake tins.

In a large bowl add sugar, flour, cocoa powder, baking powder, baking soda, and salt, whisk together.
Add the eggs, milk, oil,water and the vanilla to the dry ingredients. Beat the wet and dry ingredients together on medium speed for two minutes.
Evenly divide the cake mixture between the prepared cake pans.
Bake the cakes for 30 to 35 minutes or until a skewer poked in the middle comes out clean. Allow the cakes to cool in the pans for 10 minutes before turning them onto wire racks to cool completely.
While the cake is cooling prepare the icing.

For the Frosting

100 grams unsalted butter (softened)
3 cups icing sugar
2/3 cup cocoa powder
1/3 cup milk
1 teaspoon vanilla extract

To make the frosting- In a medium bowl beat the butter until pale and fluffy. Beat in the cocoa powder and the vanilla extract. Add the icing sugar and milk in two parts, adding a little extra milk if the frosting is too dry, continue beating until the frosting is smooth, fluffy and delicious.
Spread the bottom half of the chocolate cake with frosting. Sandwich the second cake layer on top.
Cover the entire cake with generous swirls of the remaining icing.
Enjoy with a big glass of milk!